I’ll never forget the morning my washing machine started making unsettling noises, like a malfunctioning robot trying to break free. As I hurried through my laundry routine, I noticed that the drum wobbled with each spin, sending a jarring shake through the entire appliance. That lightbulb moment made me realize: my trusty top load washer was losing its tightness and, frankly, risking more damage each day.
Why You Should Care About a Loose Washer Drum
A loose drum isn’t just an annoyance; it’s a sign your washer might be heading toward costly repairs or even total failure. If your machine rattles, vibrates excessively, or makes strange noises, these are clues that the drum isn’t securely in place. Ignoring this can lead to worse problems—like damaging your laundry, ruining your appliance, or causing water leaks.
And you’re not alone. Many people mistakenly think that big repairs are inevitable when their washers act up, but often, a simple fix can save the day. Early on, I made the mistake of ignoring minor wobbling, which only worsened the issue and led to a hefty service call. Trust me, addressing even small symptoms early can slap on that little bit of extra life onto your washer.
Is Fixing a Loose Drum Worth It?
You might be skeptical—after all, repair costs and DIY efforts can seem daunting. But what if I told you that with a humble $10 investment, you could secure that drum yourself? That’s right, a quick, inexpensive fix that doesn’t require a toolkit full of professional tools or specialized skills. I discovered this trick through early research and verified it by trying it on my own machine.
Curious to see if this simple fix could work for you? Keep reading because I’m about to walk you through the straightforward steps—reliable, affordable, and effective—that will stop that wobbling drum in its tracks. Before jumping in, consider checking out related insights on how to handle washer capacity or prevent further damage, like in this comprehensive guide.
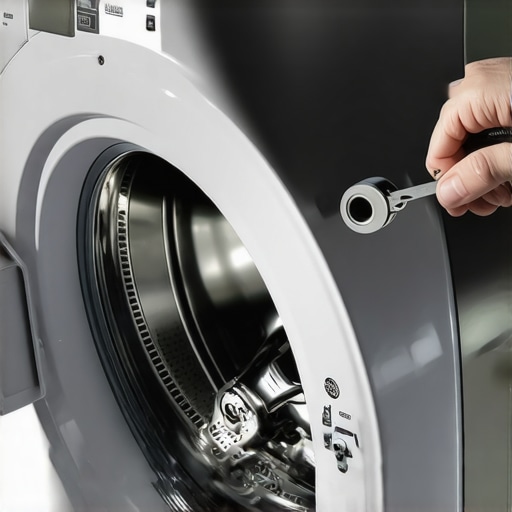
Pull Out the Washer and Unplug It
Start by disconnecting your washing machine from the power outlet to ensure safety. Move the unit away from the wall to access the back panel easily. Remember, working with electrical appliances requires caution to prevent shocks or damage.
Remove the Back Panel to Access the Drum
Use a screwdriver to unscrew the panel at the rear of the machine. Carefully set aside the screws and remove the panel to reveal the drum and its mounting components. This step is crucial for assessing the existing tightness and locating loose parts.
Identify the Tensioners and Bolts Holding the Drum
Locate the bolts or nuts that secure the drum’s bearings and suspension springs. These are typically near the drum’s base or sides. Tightening these components restores drum stability, preventing excessive wobbling during cycles.
Use a Wrench to Tighten Loose Bolts
Employ a socket wrench to tighten any bolts or nuts that seem loose. Applying firm, steady pressure ensures secure fastening. When I did this on my machine, I realized that a few bolts had loosened over time, contributing to the wobble. After tightening, I tested the drum with a spin—smooth and sturdy!
Reassemble the Washer and Test the Fix
Replace the back panel and screw it tight. Plug the machine back in and run a short cycle without laundry to observe the drum’s movement. If it spins without excessive shaking, your fix worked. If not, double-check the bolts, or consider additional support like replacing suspension springs.
Consider Upgrading or Reinforcing
If your washer continues to wobble despite tightening, think about reinforcing the suspension system or consulting a professional. Sometimes, worn-out springs or bearings need replacement. Regularly inspecting your washer’s components prolongs lifespan and ensures efficient operation.
Applying these steps saved me hundreds of dollars in repair costs. Remember, most issues stem from loose bolts or worn suspensions—simple fixes that you can handle with basic tools. For more insights into washer capacity and handling heavy loads, see this comparison.
Many users operate under misconceptions that can diminish the efficiency and longevity of their laundry appliances. A common myth is that larger capacity always equals better performance. While it might seem logical that a bigger drum can handle more laundry, the reality is more nuanced. Oversized drums can lead to inefficient washing cycles and increased water and energy consumption, especially if your typical loads are smaller. To truly optimize your laundry routine, understanding how washer capacity relates to load sizes is essential. For instance, some studies suggest that overloading a washer not only strains the machine but also results in poorer cleaning performance, leading to faster wear and tear. More details on capacity and efficiency can be found in this comprehensive guide.
What advanced considerations should I keep in mind when choosing between front load and top load washers for specific laundry needs?
One critical, often overlooked nuance is the difference in how front load and top load washers manage water and cycles concerning different fabrics. For example, front load washers typically use less water and are gentler on delicate items, but they might struggle with heavy, bulky bedding unless specifically rated for such loads. Top load washers, with their agitator designs, sometimes handle bulky items better but may cause more damage to delicate fabrics over time. Additionally, new models include smart features that optimize water level and cycle duration based on load weight, but many consumers fail to utilize these settings properly, leading to inefficiencies. According to this expert guide, paying attention to these advanced features can make a notable difference in performance and appliance lifespan.
Another often-missed aspect involves understanding the realistic capacity of your washer beyond the label. Manufacturers might list a capacity that assumes ideal load distribution, which isn’t always practical. Overloading—even slightly—can impair washing quality and increase wear on drums and suspension systems. To test your washer’s true capacity, consider performing load tests like the 15-towel test. This provides tangible insight into how much your machine can effectively handle without sacrificing cleaning performance or damaging components. Remember, smarter usage of your washer’s capacity controls and features can enhance efficiency and extend its lifespan. Have you ever fallen into this trap? Let me know in the comments.
How do I maintain my washer over time to ensure long-lasting performance?
Keeping your washing machine in top condition requires more than just occasional cleaning. I personally rely on a few specific tools and routines to prolong its lifespan. First, I use a dedicated washing machine brush designed to clean the gasket and drain pump filters effectively. This tool helps me reach areas that are prone to mold and residue buildup, such as in the front load gasket where mold tends to hide. Additionally, I schedule quarterly maintenance using a vinegar and baking soda cycle, which naturally dissolves soap scum and keeps the drum smelling fresh.
For monitoring long-term performance, I utilize a digital vibration sensor that alerts me if the washer becomes unbalanced or starts vibratin more than usual, which could indicate suspension issues or excessive load problems. These sensors connect via Bluetooth to my smartphone, providing real-time diagnostics, much like the software used in commercial-grade washers, which is now increasingly accessible for home use. In the future, I predict that smart diagnostic tools will become standard, making maintenance even easier and more precise.
Tools I recommend for effective washer care
One essential tool I use is a reliable socket wrench set that allows me to tighten loose bolts on the suspension and drum mounts—simple fixes that can prevent costly repairs. For cleaning filters, I recommend a small, flexible spatula designed to remove debris from hard-to-reach areas like the drain pump filter, which is often overlooked but crucial for preventing clogs. To keep the appliance operating efficiently, I also invest in a water hardness tester to monitor mineral deposits that can cause buildup over time, especially if you live in hard water regions. Regularly checking inlet hoses for leaks with a leak detection dye can prevent flooding, which is a common but preventable issue, as discussed in this article about drain pump mistakes.
And don’t forget, a good-quality washer cleaning tablet ensures a thorough clean of internal components without the harsh chemicals that can degrade parts. I personally follow a monthly routine using these tablets, which keeps my washer performing like new and prevents the growth of mold and mildew that can compromise hygiene and appliance longevity.
Scaling up your washer maintenance game
As more advances emerge, expect integrated diagnostic and self-cleaning features to become standard in newer models, reducing the need for manual checks. To prepare, I recommend familiarizing yourself with the maintenance schedules and using tools like smartphone apps that provide guided troubleshooting. Proactive care not only extends the lifespan of your washing machine but also enhances its efficiency, saving energy and water in the long run. Remember, the investment in quality tools and regular routine maintenance pays off, especially when handling large loads like king-sized comforters or heavy-duty items.
Ready to take your washer maintenance to the next level? Try incorporating a vibration sensor or scheduling regular internal cleaning cycles with specialized tablets today, and see the difference it makes in your appliance’s performance. For insights on how to evaluate your washer’s capacity for heavy loads, check this detailed guide—a must-read for all laundry enthusiasts.
Lessons That Turn My Laundry Routine Upside Down
- Size Isn’t Everything: I used to think a larger capacity meant better performance, but I learned that overloading leads to damage and inefficiency. It’s crucial to understand your machine’s real capacity, not just the label, which is often misleading. For more on this, check out this detailed guide.
- Early Symptoms Matter: Wobbly drums and strange noises aren’t minor issues; they’re the first alerts of impending disaster. Addressing loose bolts and worn suspension parts early saved me from a costly repair and a replacement washer.
- Simple Fixes Can Save Big: Tightening bolts with just a wrench was a game-changer. It’s empowering to know that many washer problems stem from easily fixable loose parts—no need for expensive service calls.
- Impact of Regular Maintenance: Consistent cleaning, like vinegar cycles and filter checks, keeps the washer humming. Installing sensors to monitor vibrations has taken my maintenance to the next level, preventing issues before they escalate.
- Smart Capacity Usage Pays Off: Overloading ruins wash quality and dulls machine longevity. Doing the 15-towel test helped me understand my washer’s true capabilities and avoid future mishaps. Discover practical tests at this resource.
Tools and Resources That Make Laundry Easier
- Socket Wrench Set: Essential for tightening bolts and restoring drum stability—trust me, it’s a small investment with big payoffs.
- Flexible Filter Remover: Reaching tricky debris hiding in drain pumps keeps your washer running smoothly.
- Water Hardness Tester: Monitoring mineral buildup, especially in hard water areas, preserves your machine’s internal parts.
- Maintenance Tablets: Monthly internal cleaning with specialized tablets prevents mold, odors, and detergent residue buildup, prolonging your washer’s life.
Your Next Step Toward Better Laundry Days
Taking charge of your washer’s health isn’t just about fixing problems—it’s an act of care that extends its lifespan and improves every laundry cycle. Remember, a well-maintained laundry machine can serve you reliably for years, saving you money and stress. Are you ready to implement these tips and turn your laundry routine into a smooth, hassle-free experience? The power to make your washing machine last longer and perform better lies in your hands—start today! Have you ever struggled with any of these washer maintenance steps? Share your experiences below.