Ever opened your laundry room to a stubborn layer of soap scum or residue clinging to your top load washer? I’ve been there — that frustrating moment when your freshly washed clothes come out with ghostly streaks, making you question whether your washer is actually cleaning or just spreading grime. I used to think that regular cleaning was enough, but then I realized my mistakes were unknowingly adding to the problem. That lightbulb moment hit me like a load of laundry on high spin, and I knew I had to find real solutions that work in 2026.
Why Residue Issues Can Turn into a Laundry Nightmare
Residual buildup in your washer isn’t just about aesthetics — it can seriously affect your laundry’s cleanliness and the longevity of your machine. Residue can harbor mold, bacteria, and soap scum, which not only leaves clothes smelling less than fresh but might also trigger allergies or skin irritations. Plus, over time, this buildup can cause mechanical issues, costing you more in repairs down the line. According to a recent report, improper maintenance and the use of too much detergent are common culprits behind washer residue problems, emphasizing that even seasoned homeowners can fall into these traps without realizing it.
If you’ve faced this stubborn residue sticking around despite regular cleaning, you’re not alone. Many folks are frustrated because the typical advice — run an empty cycle with vinegar or bleach — doesn’t always cut it anymore, especially with newer, more sophisticated washers emerging in 2026. Sometimes, it feels like no matter what you do, that filmy residue persists, leading to a cycle of frustration. Trust me, I’ve had my share of failed attempts before discovering tips that really work.
In the coming sections, I’ll share three proven tricks I’ve tested myself. These techniques are designed for the top load washers of 2026 and beyond, considering how smart technology and new detergent formulations have changed the game. By applying these tips, you can banish residue for good — and restore your washer to peak cleaning performance. Curious to see if these methods will finally solve your washer woes? Let’s dive in and get your laundry space sparkling again.
Is your residue problem really worth the hype, or are you just wasting time?
Early on, I made the classic mistake of using too much detergent because I thought more was better. That only accelerated residue buildup, turning my washer into a dirty monster instead of a cleaning powerhouse. Once I realized my mistake and adjusted my approach, the difference was night and day. Want to avoid the same pitfalls? Check out my detailed guide on energy-efficient washers ideal for 2026 for more tips on maintaining your investment. Ready to transform your laundry routine? Let’s begin with the first trick.
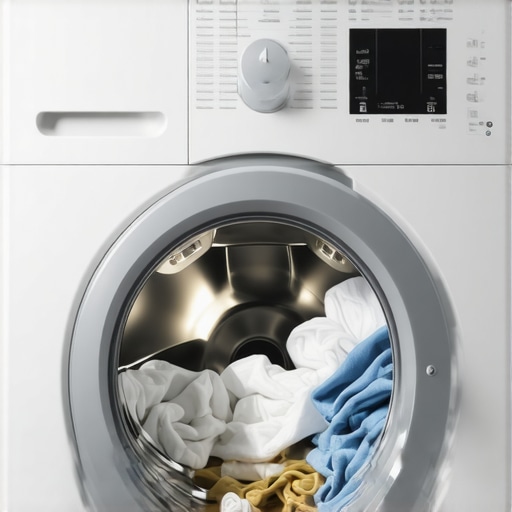
Choose the Right Detergent and Use It Correctly
Start with selecting a high-quality, low-residue detergent designed for modern washers. Opt for pod or concentrated formulas that minimize soap scum buildup. When loading your machine, use the recommended amount—adding too much can leave residue, as I learned during a messy laundry day when I overfilled my top load washer, causing foam to spill over and leave soap deposits on the drum. Measure carefully and avoid the urge to dump extra detergent.
Regularly Run Deep Cleaning Cycles
Use Specialized Cleaners
Invest in machine-specific cleaning agents that target residue and mold. For front load washers, if you notice mold or a musty smell, run a cleaning cycle with a commercial cleaner like Affresh or a homemade solution of baking soda and vinegar, following instructions from this guide. During one session, I poured a cup of baking soda into the drum and added vinegar to the detergent compartment—resulting in a cleaner, fresher washer that no longer left residue on my clothes.
Execute Monthly Maintenance
Set a reminder to run a deep clean cycle once a month. For top load machines, do a hot wash with two cups of bleach or a commercial cleaner, but for front loaders, stick to enzyme-based cleaners to avoid damage. Remember, overusing bleach can degrade gaskets and seals over time, which could lead to mold growth if not rinsed properly. Following these steps helped me keep mold and soap scum at bay, extending the lifespan of my washer.
Keep Gaskets and Seals Dry and Clean
Moisture trapped in gasket folds fosters mold growth, often responsible for residual smell and grime. After each wash, wipe gaskets with a dry cloth and leave the door slightly ajar to ventilate. During a particularly damp week, I noticed black mold spots forming; tackling this with a mixture of water and vinegar, and repeating weekly, kept my washer fresh and residue-free. Regular maintenance like this prevents build-up that can hide in hard-to-reach places.
Manage Load Sizes and Wash Settings Smartly
Overloading your washer or selecting overly aggressive cycles can prevent thorough rinsing and promote residue buildup. Think of your washer as a washing chef—if overcrowded, it can’t work efficiently. For heavy blankets or bulky items, ensure the machine’s capacity isn’t exceeded by consulting capacity guidelines. During one session with a king-sized quilt, I learned that exceeding my machine’s weight limit caused soap residue and poor wash quality, emphasizing the importance of respecting load capacities for optimal results.
Utilize Hot Water Settings When Appropriate
Hot water helps dissolve soap scum and kill mold spores. Whenever possible, select the hottest cycle suitable for your fabrics—this is especially effective for towels and bedding. I discovered this during a weekend when switching to a hot wash completely eliminated soap residue from my dark jeans, which always seemed to come out with streaks after cold washes. Just ensure your washer’s manuals recommend hot cycles to prevent damage.
Prevent Mechanical Causes of Residue
Inspect and clean the filter and lint trap regularly to prevent debris from recirculating. If your washer has a removeable filter, clear out lint, hair, and dirt biweekly. During one quick cleaning, I found a surprising amount of fluff in the trap, which, once removed, helped restore proper water flow and rinsing. This simple step stops potential sources of residue from settling back onto your clothes or inside the drum.
Stay Consistent with Maintenance Routine
Consistency is key. Incorporate these steps into your cleaning schedule—weekly gasket wipes, monthly deep cleans, and appropriate load sizes. I made a habit of checking my washer’s seals and running maintenance cycles, which kept my machine performing like new and markedly reduced residue issues. Small, regular actions prevent the buildup from becoming a major cleaning headache, saving you time and repair costs over the long haul.Many homeowners assume that selecting a washer with a larger capacity simply means more space for laundry, but the reality is more nuanced. While a bigger drum can handle larger loads, opting for an excessively oversized machine can introduce common pitfalls, especially in the context of top load washers and front load washers. One widespread misconception is that a washer’s capacity is directly proportional to its efficiency and longevity; however, overloading a machine beyond its optimal capacity can cause mechanical stress, increased residue buildup, and uneven washing cycles. According to appliance experts, choosing the right capacity isn’t about maximum size but about matching your typical laundry volume and types of loads to avoid unintended damage and inefficiency. For example, trying to fit an entire king-size comforter into a machine labeled as 4.5 cubic feet might seem sufficient, but many models struggle with bulky items, risking damage or incomplete rinsing, which can eventually lead to mold growth or residue problems. The oversight often stems from relying on surface labels like the ‘XL’ tag without considering the actual load measures and wash cycle capabilities outlined in detailed specifications. Doing so may seem like a smart move to save time, but it can backfire, causing overloading, mechanical wear, and frequent maintenance issues. To make an informed choice, it’s crucial to analyze the specific wash needs—such as handling thick blankets or multiple small loads—and compare models on parameters like actual capacity and cycle options. For a deep dive into selecting the ideal washer for your household size and laundry habits, I recommend reviewing this comprehensive guide on capacity tips for top and front load washers. Remember, selecting a washer that matches your real laundry load, rather than just its labeled capacity, can improve efficiency, extend appliance lifespan, and save money over time. Have you ever fallen into this trap of overestimating your washer’s capabilities? Let me know in the comments.
Tools I Recommend to Keep Your Washer Running Smoothly
Maintaining a washer in peak condition requires more than just occasional cleaning — it involves using the right tools and adopting precise methods. I swear by a quality digital multimeter, such as the Fluke 117, which helps me troubleshoot electrical issues quickly and safely, especially if your washer starts acting up unexpectedly. Additionally, a flexible inspection mirror is invaluable for accessing hard-to-reach areas within gaskets and seals, enabling me to catch mold or debris early before they become major problems.
For cleaning, I rely on a commercial washer-specific cleaner like Affresh, which is formulated to dissolve residue and prevent mold growth. I prefer this over household vinegar or bleach because it’s designed specifically for modern machines and their electronic controls, ensuring I don’t accidentally damage delicate components. A microfiber cloth is my go-to for wiping down gaskets and control panels, maintaining a hygienic environment and avoiding residue buildup that could interfere with washer operation.
Learning to interpret diagnostic codes from your washer’s digital display is crucial. Modern washers are becoming increasingly sophisticated, often providing specific error codes that indicate issues like drainage problems or sensor failures. Investing in a diagnostic code reference chart or a compatible smartphone app helps me diagnose minor issues myself, saving time and repair costs.
How do I maintain my washer over time for best results?
Establishing a regular maintenance routine is key. I set a monthly calendar reminder to run a deep clean cycle with a machine-specific cleaner, focusing especially on front load washers where mold and residue tend to hide in seals and drains. Ensuring the door gasket is dry and free of debris after each wash prevents mold colonies from forming, which is critical for maintaining odor-free operation. Additionally, inspecting and cleaning filters and lint traps every few months, as recommended by manufacturers, helps prevent mechanical failures and residue buildup.
In the future, I predict that smart diagnostic tools and IoT integration will make maintenance even more straightforward. Devices that alert you to potential issues before they escalate will become standard, reducing appliance downtime and repair costs.
If you haven’t tried it yet, I highly recommend adopting an electronic multimeter for troubleshooting or investing in a dedicated cleaner like Affresh. These tools have saved me hours of frustration and significantly prolonged the life of my washing machine. Remember, consistent, proactive maintenance is the secret to keeping your washer effective and efficient for years to come!
The Hidden Truth About Overloading and Underloading Your Washer
One of the most eye-opening lessons I learned was that more isn’t always better when it comes to laundry. Overloading my washer seemed like a good way to save time, but I soon realized it caused residue buildup and mechanical strain. Conversely, underloading led to inefficient washes and wasted water. Striking the right balance has transformed my laundry days, and understanding my washer’s true capacity has been a game-changer. Never assume that the largest capacity means you should overload—know your machine’s limits for optimal results.
What I Wish I Knew Before Picking My Washing Machine
Initially, I focused solely on capacity labels like ‘XL’ without digging into actual load measurements. This oversight led to frequent issues with residue and appliance longevity. After researching and consulting experts, I discovered that choosing a washer based on real-world capacity and your laundry habits is crucial. For instance, if you regularly wash bulky items like comforters or heavy blankets, selecting a machine with proven capacity specs, like those outlined in capacity tips for washers, ensures superior performance and fewer maintenance headaches.
Learning the Hard Way About Wash Cycle Efficiency
In my early days, I assumed that longer cycles and higher water levels automatically meant cleaner laundry. That wasn’t true, especially with newer, smarter washers in 2026. I found that selecting the right cycle tailored to the load type and size, combined with appropriate load management, greatly improved residue removal and machine health. This realization is supported by insights from heavy blanket washing tips. It’s about knowing your machine’s capabilities and respecting them—an often overlooked but vital piece of the laundry puzzle.
Tools and Strategies That Changed My Laundry Game
Investing in practical tools like a reliable digital multimeter and a dedicated commercial cleaner, such as Affresh, was transformative. These tools helped me troubleshoot issues early and maintain my washer proactively, preventing residue buildup. Consistent gasket wiping and filter cleaning, combined with awareness of load size and cycle selection, kept my washer running smoothly. Learning from tips on fixing washer odors reinforced the importance of routine maintenance. Embracing these strategies saves time, money, and frustration, ensuring my laundry room remains a sanctuary, not a source of stress.
I really appreciate this detailed breakdown of fixing washer residue — it’s easy to overlook how much detergent we use, especially when trying to get clothes extra clean. Overfilling the machine with too much soap definitely contributes to persistent buildup, and it’s good to see solutions tailored for 2026’s smarter washers. I’ve started using low-residue detergents and now I always measure carefully, which has already made a noticeable difference in how clean my clothes look and how my machine performs. The tip about running regular deep cleaning cycles with specialized cleaners is also a game-changer. I often forget to do this, but I’m planning to set monthly reminders now. Have you found any particular brands or types of cleaners that work best without damaging the newer electronic controls? Also, what’s your take on using vinegar versus commercial cleaners for maintenance? I’d love to hear other readers’ experiences.